External hard drives may be handy for storing data and creating backups. Many individuals keep a backup of their important data on an external hard drive in case of data loss on their PC. Well, there are advantages and disadvantages to using an external hard drive. When attempting to use a hard drive on your PC, you may face the problem of an external hard drive not showing up in Windows 11.
This is a typical issue that many users have faced while attempting to use an external hard drive. One may face this issue for various reasons, including faulty hard disks, faulty USB drives, and mismatched driver versions. Due to a faulty hard drive, many users are concerned that they may face this error. There is a probability of that occurring; however, facing this issue does not necessarily indicate that the hardware is faulty; it might be due to conflicting or incompatible drivers or other factors.
How To Fix Quickly External Hard Drive Not Showing Up In Windows 11?
This is not a new error you may encounter in Windows 11, as users have reported facing this issue in Windows 10. Therefore, you should be fine with this issue. In this post, we’ll look at how to fix an external hard drive not showing up in Windows 11.
Try Basic Fixes
Well, check whether or not your drive is turned on. If you use an external hard drive, it may feature an LED light to show that it is powered on. You may also hear a fan rotate, indicating the hard drive is turning on. If you didn’t observe any of these symptoms, try swapping the ports and cable. It needs to be corrected if the hard drive still won’t boot. If the hard drive comes on after you swap the port or cable, this might indicate that the port or cable is faulty. You’re fine to go if you can use the hard drive after this. If you still can’t use the hard drive, try using it with another PC and restarting your computer. If that does not work, move on to the next steps.
Check Disk Management
Well, if your hard drive is not visible in File Explorer, it can be seeable in Disk Management. Drive Management enables you to format your drive, create a new partition, and perform various other tasks. The hard drive you’re attempting to use may not show up in File Explorer in the case of unallocated space. However, your disk will undoubtedly show in Disk Management. To open the disk manager, press the Windows + X key combination and select Disk Management from the menu. Also, if your disk is in disk management but does not show up in File Explorer, proceed to the next step to resolve the issue.
Format External Hard Disk
Well, if your hard drive is not showing up in File Explorer, you must format it using Disk Management. Follow the instructions below to format the external hard drive using Disk Management.
- To launch the Run dialog box, use your computer’s Windows + R key combination.
- For example, to open Disk Management, enter diskmgmt.msc in the Run dialog box and click OK or Enter. Then, click Format in Disk Management after right-clicking on the disk that has the issue.
Next, you’ll be asked to enter the volume label, file system, allocation unit size, and whether or not you want a fast format. After that, click OK to proceed.
This should resolve the issue of the external hard drive not showing up in Windows 11. Follow the following troubleshooting technique if you continue to encounter the issue.
Create New Volume
Well, if the external hard drive is still not showing up in Disk Management, try establishing a new volume. Follow the instructions below to do this.
- From the power menu, choose Disk Management. Next, press the Windows + X key combination and select Disk Management from the menu.
- Well, check whether the drive is already an unallocated space or the main partition in Disk Management. The unallocated area will have a black bar, whereas the top of the main partition will have a blue bar. If the drive is a main partition, you must make unallocated space. You may move on to the fourth step if the drive has unallocated space.Please right-click on the problematic volume/drive and choose to erase volume to erase it and make it an unallocated space. A black bar will occur on the top of the drive after this, which means the drive has been correctly designated as an unallocated space. It would be best if you created a new basic volume of the space.
Right-click on the free area and choose New Simple Volume. This will open the New Simple Volume Wizard; here, click Next.
- You will be asked to enter the Simple Volume Size in megabytes (MB). The size you enter must not exceed the maximum disk space. After that, click Next.
Then you have two options: assign the drive letter and/or mount it in the empty NTFS folder. First, select Assign the following drive letter, followed by the drive letter you want to follow. Next, click.
- You’ll be asked whether you wish to format the drive. First, choose Format this volume using the following options. After that, you must configure the file system, assign unit size, and label the volume. Once you’ve completed all of this, click Next.
- The procedure will be finished. Click Finish to close the New Simple Volume Wizard.
Once you do this, the drive will open in the File Explorer, indicating that the issue has been fixed properly.
Check Drive Status
You can check the drive status using the device manager. This will show whether or not the device is operational. Follow the instructions listed below to check the drive status.
- Launch Device Manager by searching in the Start Menu.
- Double-click on the Disk Drives section to expand it.
- Right-click on the drive that contains the error. To open the properties, click the Properties button.
- The Device Status may be found on the General tab of the properties. Check to see whether it shows the device is operating correctly. You may search for and resolve any error messages that it shows.

Updating Hard Drive Drivers
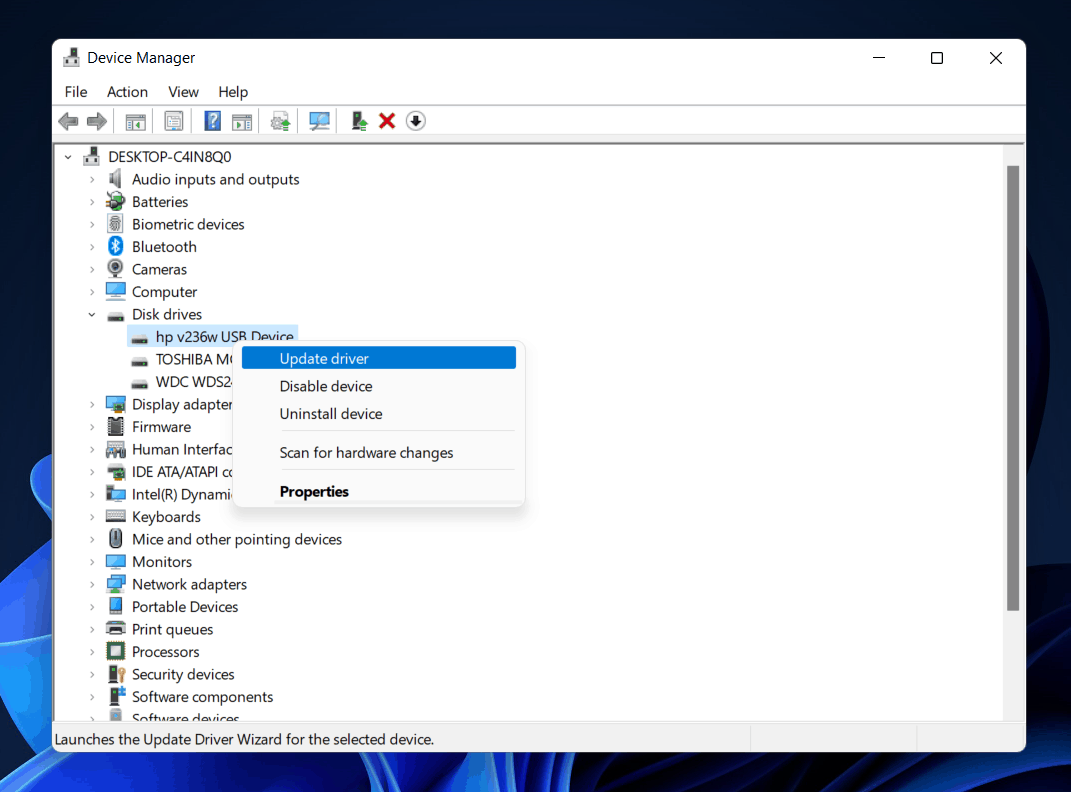
You could update the hard drives and check whether the error still exists. Then, follow the instructions below to upgrade your hard drive drivers.
- Launch Device Manager by searching in the Start Menu.
- To expand the Disk Drives section, double-click it.
- Right-click on the drive that has the error.
- Click the Update Driver button.
Close the Device Manager and restart the computer after updating the driver.
You should no longer face the issue of the external drive not showing up in Windows 11.
Reinstall Hard Drive Drivers
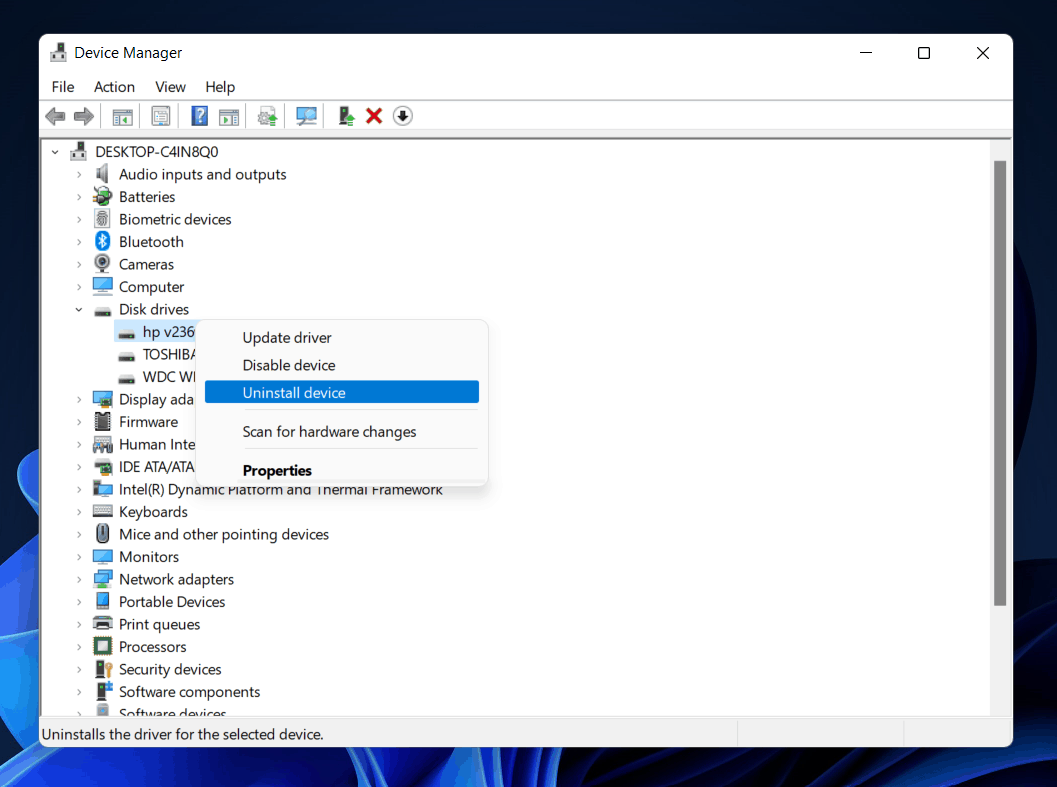
Well, if none of the above steps worked, try reinstalling the hard drive drivers. You may do this with the assistance of the device manager. Follow the steps below to reinstall hard drive drivers using the device manager.
- From the Start Menu, choose Device Manager.
- To expand the Disk Drivers option, double-click on it.
- Right-click on the error-prone drive and choose Uninstall device.
After that, restart your computer, and the driver will be reinstalled automatically.
Conclusion:
This should now resolve the issue. The external hard drive not showing up in Windows 11 may be resolved by following these recommendations. We wish this post were useful in resolving the issue you were facing.


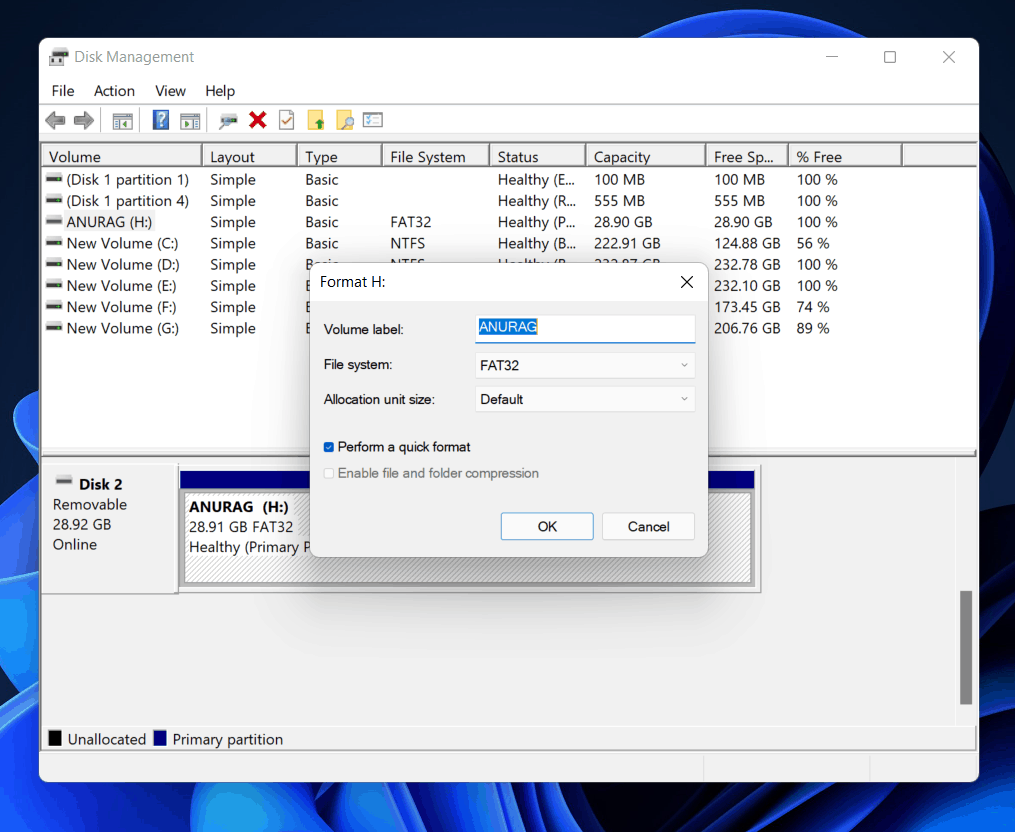 Next, you’ll be asked to enter the volume label, file system, allocation unit size, and whether or not you want a fast format. After that, click OK to proceed.
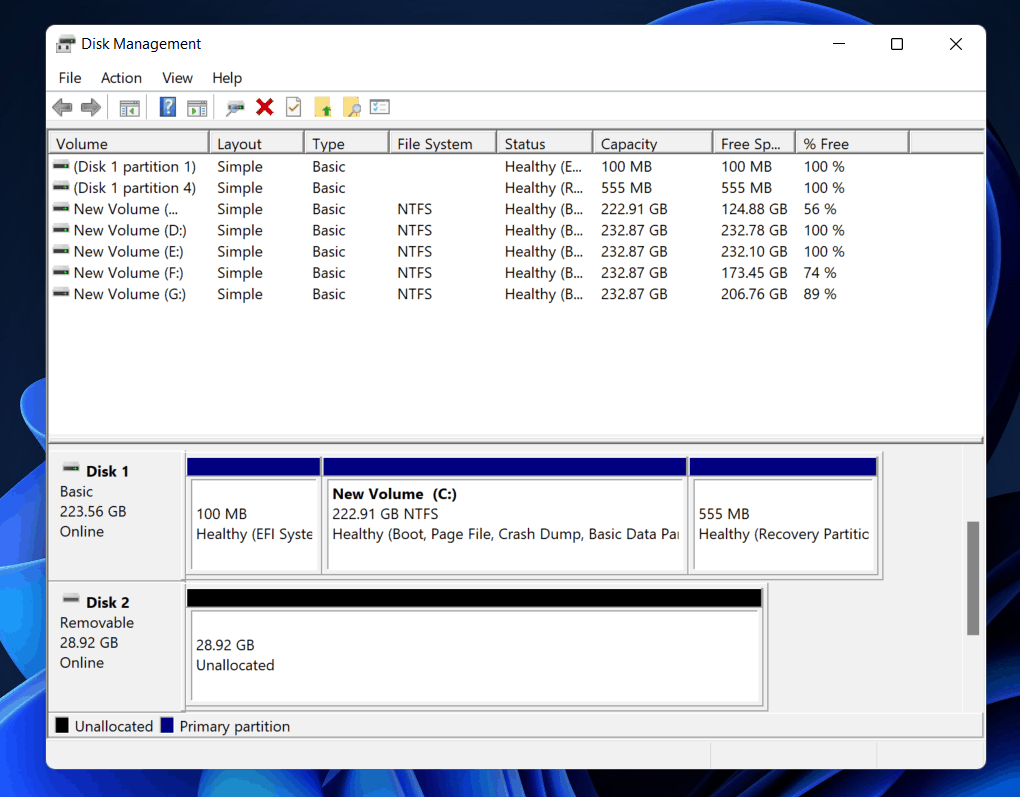 Right-click on the free area and choose New Simple Volume. This will open the New Simple Volume Wizard; here, click Next.
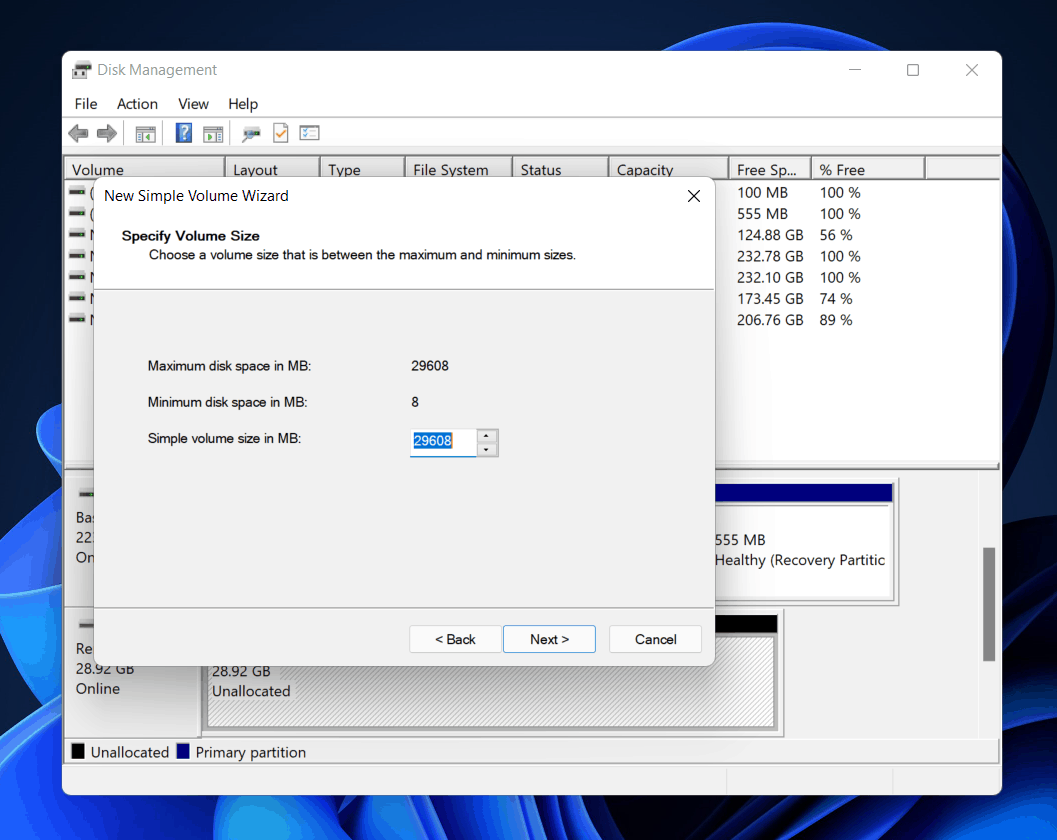 Then you have two options: assign the drive letter and/or mount it in the empty NTFS folder. First, select Assign the following drive letter, followed by the drive letter you want to follow. Next, click.
 Close the Device Manager and restart the computer after updating the driver.
 After that, restart your computer, and the driver will be reinstalled automatically.
