There are several sorts of BSOD errors in Windows 11. Another typical BSOD error that many customers have reported facing lately when using Windows 11 is the Machine Check Exception error. You may face this issue on your PC for various reasons, including faulty system files, malfunctioning RAM, overclocking the CPU, problems with the system, and obsolete or buggy drivers. If you’ve been facing the Machine Check Exception issue in Windows 11, it might be due to one of the reasons listed above. If you’ve been facing Machine Check Exception in Windows 11 and are seeking a solution, you’ve come to the correct spot.
Machine Check Exception In Windows 11? How To Fix
This Windows 11 troubleshooting article will teach you how to fix Machine Check Exception in Windows 11.
Unplug Accessories
You may run into this issue if you try to use incompatible accessories with your smartphone. You could disconnect all the peripherals that aren’t essential for your PC to function correctly. Check to see if you are still experiencing the same issue. Try going on to the next step in this article if you are still experiencing the issue.
Undo Overclocking
If your PC has been overclocked, this might be another reason you are facing the machine check exception issue in Windows 11. Overclocking enables you to increase the performance of your computer. However, this may increase the voltage input needed and create a hardware issue, resulting in the Machine Check Exception in Windows 11. You should thus try reversing the overclocking on your PC to see if it fixes the issue. Check to see whether the issue continues after redoing the overclocking. If you still face the issue, you should move on to the following step in this article.
Run SFC Scan & CHKDSK Command
Another thing you may try is running the SFC scan. SFC, or System File Checker, is a built-in system tool that allows you to search your PC for issues caused by damaged system files. Follow the steps listed below to run SFC Scan.
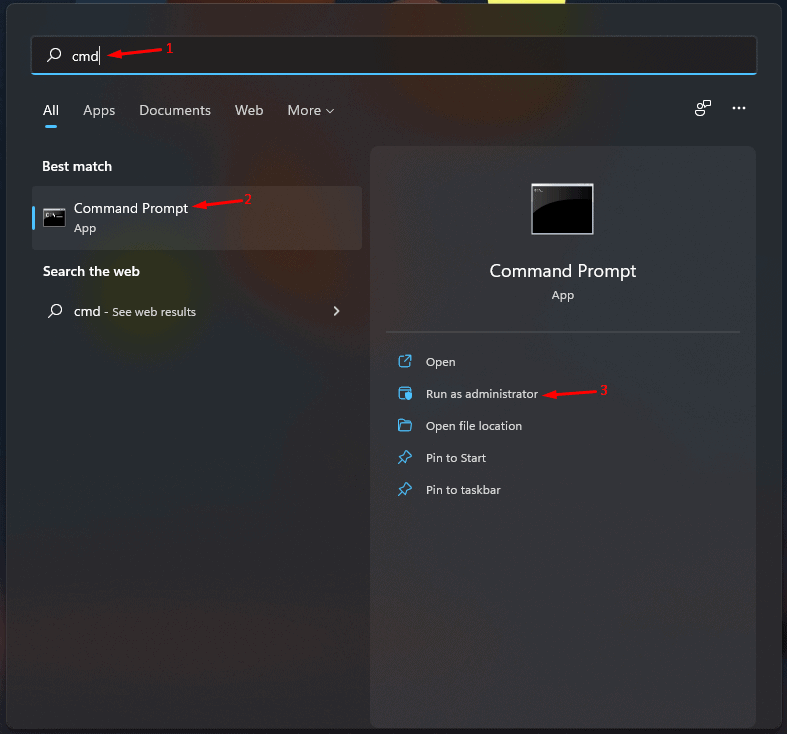
- By pressing the Windows key, you may access the Start Menu. CMD may be found by searching the Start Menu.
- Now, in the Start Menu, right-click Command Prompt and choose Run as administrator. When UAC appears, click Yes to allow the Command Prompt to run with administrator rights.
- To execute the command, type sfc /scannow on the Command Prompt and press Enter.
- Wait for the process to finish. Close the Command Prompt, restart your PC, and the issue should be fixed.
If running the SFC command does not fix the issue, try the CHKDSK command. This command checks for and fixes a disk issue. To do this, follow the steps outlined below.
- As in the previous steps, open the Command Prompt with administrator rights.
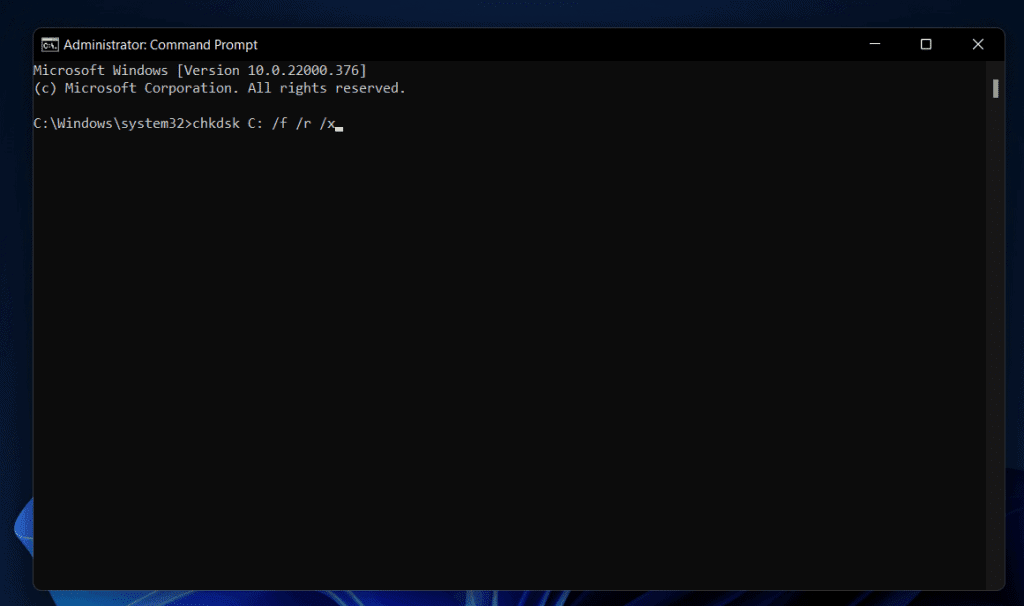
- To execute the command, type chkdsk C: /f /r /x in the Command Prompt & press Enter.
- Wait for the process to finish before restarting your PC.
The issue should be fixed by doing this. Move to the next step if the issue is not fixed.
Run Windows Memory Diagnostic Tool
Because of faulty RAM, you could face this issue. You could execute the Windows Memory Diagnostic Tool to evaluate the memory for any issues and fix them. Follow the steps listed below to run the Windows Memory Diagnostic Tool.
- To open the Start Menu, use the Windows key. To open the app, search for Windows Memory Diagnostic in the Start Menu & press Enter.
- Click Restart now & check for the option of the problem in the Windows Memory Diagnostic app box.
This will restart your PC and check for any RAM problems. Check for and fix any RAM issues that may be found. You are most likely facing the machine check exception in Windows 11 for other reasons if no issue is found in the memory.
Update Drivers
Due to outdated drivers, you may face this issue. You could update your PC’s drivers to see if it fixes the machine check exception error in Windows 11. To update drivers, their are many options. The official website of your hardware has a download link for the drivers. Suppose you have a laptop, head to the laptop’s official website and download the drivers from there. Using Windows Update is another option to update drivers. Follow the instructions below to do this.
- By pressing the Windows + I key combination on your Windows 11 PC, you may access the Settings app.
- Navigate to the Windows Update area on the Settings app’s left sidebar.
- Click Check for updates on the right side of the page.
- When your PC detects the update, it will display an Optional updates area. All the drivers’ updates are available when you click it.
- After downloading & installing the drivers, restart your PC.
You may use third-party driver updater apps to update the drivers on your PC. Use apps such as Driver Booster or DriverPack Solution to update drivers on your PC. These apps allow you to update your PC’s drivers automatically.
Run Startup Repair
Another thing you might try is running the Startup Repair. Follow the following steps to run Start Repair.
- To open the Settings app on your PC, use the Windows + I key combination.
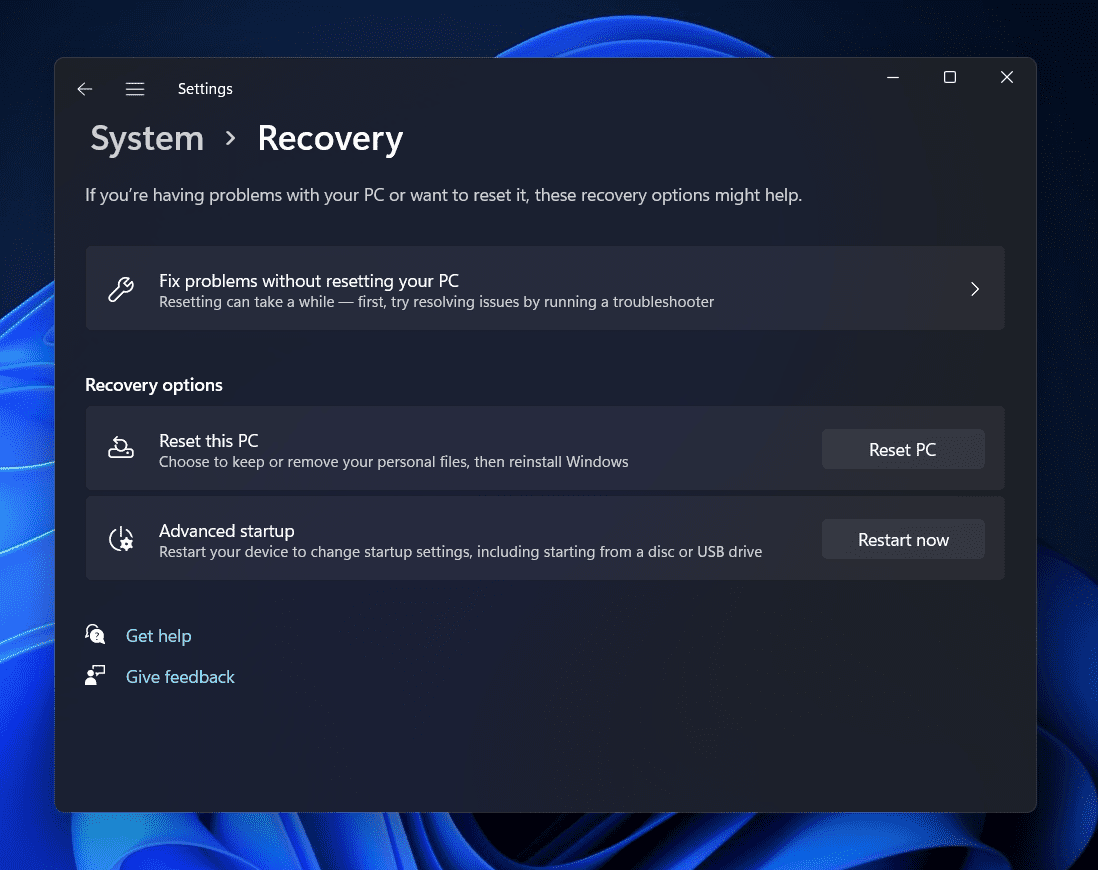
- On the right side of the Settings app, choose the Recovery option.
- Right next to the Advanced Startup, click the Restart Now option.
- The Windows Recovery Environment will open, and your PC will start. To troubleshoot, click here.
- Click Advanced Options in the next box.
- After that, click Startup Repair. The issue should be fixed now, and Startup Repair will start.
Check Hardware
If something else is needed, you should inspect the hardware. Faulty hardware may be the reason why you’re facing the issue. As a result, check your hardware. You may take your PC to a repair facility and have it checked for defective hardware. You will no longer face the issue once the hardware is fixed.
The Bottom Line:
If you face a Machine Check Exception issue in Windows 11, try the above steps. We went through the troubleshooting steps for fixing the machine check exception issue in Windows 11.


